
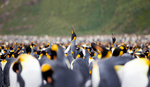
The bee photo is a summer rite of passage that any new (or old) photographer needs to take. It's not really officially summer until you get that photo, so here are some basic tips to get started photographing these colorful creatures.
Macro photography is a specialized skill to begin with, and adding fast-moving insects to the mix is certainly a challenge, but can also be quite fun. If you're hoping to go out and achieve this type of photography with a kit lens and no practice, while it's certainly possible, it's also very difficult. Here are two gear tips and two shooting tips to help. You are on the right path for this kind of photography.
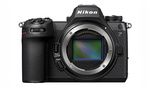
While ordinarily the megapixel wars don't matter, in macro photography of tiny moving creatures, resolution is everything. You may not get the composition you want or may not be able to get close enough, and so the ability to crop is crucial. While something in the 24-megapixel range, like a Canon EOS R6 Mark II or Nikon Z6 III are good places to start, something like a Canon EOS R5 (which was used for all of the shots in this article) or a Nikon Z8 brings 45 megapixels or so to the party. That's pretty good for a deep crop like this one:

Also key to good bee photography is the right lens. While it's possible to use non-macro lenses, when you're dealing with the world of the small, regular lenses often won't let you focus close enough. That's where a macro lens, with a much shorter minimum focusing distance, will help out. In the Canon R-Mount, the Canon RF 100mm f/2.8 L Macro IS USM Lens is a solid choice that can give you a decent amount of working distance for bees, and for Nikon, the equivalent would be the Nikon NIKKOR Z MC 105mm f/2.8 VR S Macro Lens. There are shorter macro lenses out there, but I wouldn't go any shorter just because getting too close to a bee is not only difficult, but also an unsettling experience if you're not comfortable with them.
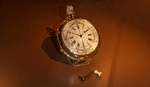
Finally, knowing your equipment and settings is crucial. Many cameras have a "spot focus" option that allows you to focus on a very, very small box within the frame. While in normal usage, this mode can result in a lot of missed focus, for macro photography, it affords an extra level precision over the standard focusing areas. I was able to nail the bee's eye this way in this photo:

While it may seem like the movement of the bee is minimal, the reality is that even at shutter speeds north of 1/1000 of a second (the main image at the top of the story is 1/1600) bee wings move so fast that they'll still blur. Goosing your ISO helps compensate for that. Once you've dialed in that faster shutter speed to go with the higher ISO, it's just a matter of patience and waiting for the bee to lean into your field of focus at just the right moment.
These are some helpful tips to get you started. If you've already hit the nearest arboretum or rhododendron and gotten a great bee photo, please share it in the comments below.


Those bee-shots are amazing (especially the 3rd one). Better than mine, but I need to get a real macro lens, or at least a macro-lens-kit. But it would seem that 1/1000 isn't fast enough as pointed out, in full sun, I would try to swing for the fence and go for 1/4000. To see if I could get the wings to freeze. I've only tried once so far.
I have been into photography since I was 9 withy terrible 110 cartridge camera (I'd pay anything to have tht camera back). And I have kept bees for years. Working close to bees really isn't that scary once you understand them. Yes, messing around with their hive will cause a reaction! But a single bee gathering nectar and pollen will never get upset with you, even working very close. They just don't have time for your silliness. Obviously don't sway at them, even if they happen to fly up into your face. Just gently brush them away. They are not looking for a fight. Only nectar and pollen.
While owning that RF 100mm f2.8 macro lens would be amazing, it's not actually needed. There are plenty of cheaper alternatives available. I have done great things with the classic Canon ED 85mm f1.8 and some extension tubes. That allows you to work close and still use the autofocus ability.
But what I love to use these days are my vintage lenses from Takumar, Pentax, Minolta, Konica, Helios, Industar and yes, even Nikon.
While these are all manual focus, manual aperture lenses, the look they produce is amazing.
One of my favorites is the Super-Multi-Coated Takumar 50mm f4 macro. It's a M42 mount lens, so it's easy to adapt to basically all Mirrorless bodies. Then add a focusing helicoid behind the lens and you quickly get into the 1:1 macro range. The lens is very, very sharp and easy to use.
Good copies of this lens are readily available online through eBay, FB Marketplace and others.
Obviously no Auto-Focus, but in Macro photography, you should really be pulling your own focus.
You've not mentioned using a good, sharp telephoto lens for bees, which gives you a deeper macro focal plane to shoot within. I'm assuming it's only because you were edited for length that Micro 4/3 systems were omitted from your macro photography choices, because within M4/3 there are a couple of lens options, in particular, which let you get maximum bee fuzziness at a safe distance. The new OM System 90mm Macro PRO is unsurpassed for pure close-up work, but my go-to bee & wasp lens has always been my Olympus 40-150mm f/2.8 PRO, allowing me fantastic autofocus on active bees from distances which don't bother the busy subjects. Telephoto macro is an underrated technique in these situations. The image provided was taken just this way -- there was no sharpening, luminance or saturation added, just white balance tweaking, a bit of texture for the flower and some white boost.
I love Micro Four Thirds! I've been a Panasonic/Olympus shooter for years, and yes, a great system and many great options there. But yes, length and clogging the text up trying to get every brand in there does factor in sometimes. Apologies!
Here is just a snapshot I took yesterday with my Nikon Z7 (45MP) and my Nikkor 24--120/4 S. The 24-120 has good close focusing capabilities. I don't think I was even at the close focus limit. The image is heavily cropped to 3.4MP. F11, 1/500, ISO220.
You don't need a Macro lens or 45mp to take great shots of bees. I use Canon R50 + RF 100-400 and 1.4 converter. I took these shots with this set up.
Those are great. But I'm thinking that the teleconverter sounds counterintuitive to what we've been taught about trying to focus on these flowers and bees. How far away are you? Wouldn't it be easier just to use the lens without the 'tele'? and stand a little closer. Usually when the bees are busy doing their thing, you don't have to worry about being stung. I did get shots with my zoom-lens of flowers and bees, but it's hard to get it just right. I've only made one attempt. this year. I'll try again next year. It just seems like the 'Tele' would just complicate the process and make the whole thing harder. The Macro-lens concept is that you can hold your lens really close. The bees shouldn't care. correct me if I'm wrong.
Edit: I got my best shots of a hover-fly. (flower-fly)
Yeah, it definitely seems like busy pollinators couldn't care less about you when the blossoms are freely givin' it up. But when it's NOT that pollinating season, or when its wasps & more concerning spiders, telephoto is the way to go. Besides, other than not causing undue stress to these little critters ... never push your luck with something that stings.
Telephoto yes, but I was abbreviating 'Teleconverter'. Sorry for the confusion. The above poster, not only used his 100-400 but also added 1.4x. (I thought that was overkilling it)
I find using the teleconverter helps me to fill the frame getting more pixels on the subject. It also allows me to stand further back around 4ft. This set up is also very good for dragonflies and small birds giving me an equivalent maximum focal length of around 895mm. As you can see from the images I posted it works for me. The R50 with RF 100-400 and 1.4 converter is an amazing low cost light weight walk about option that covers most wildlife opportunities.
Well the max focal length is still 560mm. You mean with your APC crop factor it cuts off to appear 800+. (old argument) I guess I never thought of trying to hold a huge lens with a teleconverter to shoot a bee. (maybe with a monopod) You'd have to keep it pretty steady.
Lens camera and TC weigh less than 1.3 kg. That's one of the lightest set ups you can get for this amount of reach. I think the results I get speak for themselves. My Nikon Z7 and 180-600 weighs nearly 3kg. Also gives great results but I find it too heavy to hand hold for any length of time. The animal eye detection is also greatly superior in the R50 - As good as the Z8 - Canon has really nailed autofocus even in its cheaper cameras unlike Nikon.
Roger that -- that tracks. And I've found that judicious use of the newest AI plug-ins can alleviate a lot of the image issues which come with a teleconverter. If the eyes and the pollen are in focus, generally, the bee is in focus.